Introduction
If you are committed to improving the search engine visibility of your website, you have to learn to utilize Google Search Console. Google offers this free tool that provides you with information on how your website performs in the search results – from the keywords that attract traffic to which pages need SEO optimization.
For beginners, Google Search Console can be a bit overwhelming initially. But after you master the basics, it’s one of the most valuable tools in your SEO toolkit. Whether you’re maintaining a blog, ecommerce site, or business website, GSC helps you monitor performance, fix errors, and optimize for better rankings — for free.
In this course, you’ll discover precisely how to install and utilize Google Search Console to track search traffic, troubleshoot issues, and improve your site’s SEO step by step.
How to Set Up Google Search Console
Setting up Google Search Console is the initial step to start using this wonderful tool. If you have not already connected your website, the following are the simple steps to start:
Step 1: Create a Google Search Console Account
Go to the Google Search Console website (search.google.com/search-console).
Sign in with your Google account. If you don’t have one, create a new Google account.
Once you are logged in, click the “Start Now” button to begin your website setup.
Step 2: Add Your Website Property
You’ll be prompted to add your website as a property. Within Google Search Console, you can add two kinds of properties:
Domain Property: Includes all subdomains (e.g., www and non-www variations).
URL Prefix: Includes a particular subdomain or URL (e.g., https://www.example.com).
Choose the choice that best for your site. The domain property is the one to use with most users as it includes all under your domain.
Step 3: Validate Ownership of Your Site
For verification that you own the site, you verify it. Here are several means to do that, including:
HTML file upload: Google provides you with a file that you place in the root directory on your site.
HTML tag: Google provides a meta tag that you can add to your website’s HTML header.
Google Analytics: If you have Google Analytics already installed on your website, you can verify ownership through your Analytics account.
Google Tag Manager: You can also verify using Google Tag Manager if you have it installed.
Step 4: Submit Your Sitemap (Optional but Recommended)
A sitemap enables Google Search Console to crawl and index your site more effectively. To submit your sitemap:
Go to the Sitemaps page in Google Search Console.
Enter the URL of your sitemap (in most cases something like https://www.yoursite.com/sitemap.xml).
Click Submit. This helps Google find and index all the important pages on your site.
Overview of the GSC Dashboard
After you’ve finished the successful deployment of Google Search Console, now it’s time to move to the main dashboard. GSC’s dashboard is where all of the important information about the performance of your site, indexing status, and other essential SEO elements converge. Let’s break down the building blocks you’ll be working with.
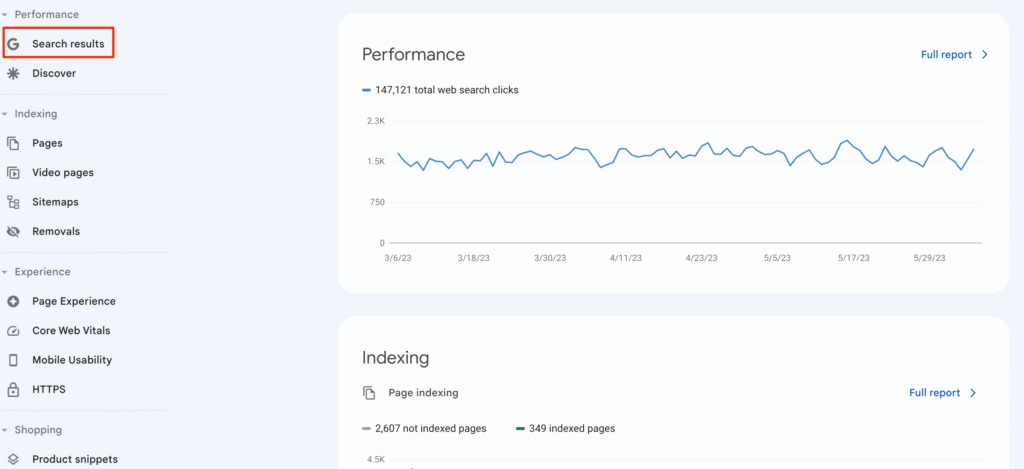
- Performance Report
The Performance section is one of the most important sections in Google Search Console. Here you can see how your website performs in Google Search, for example:
Total Clicks: How many times users clicked on your site in search results.
Total Impressions: How many times your pages appeared in search results.
Average CTR (Click-Through Rate): How many users clicked on your site after it appeared in search results.
Average Position: Your average ranking position in search results for your website.
This section helps you identify which pages or keywords are performing well, and where you can improve.
- URL Inspection Tool
The URL Inspection Tool allows you to test the status of any individual page on your site. You can:
Verify if the page is indexed by Google.
See any issues that might be preventing the page from being indexed.
Request indexing for updated or newly published pages.
The tool comes in handy to ensure that Google will crawl and index your content the right way.
- Coverage Report
Coverage page tells you whether there’s something wrong with indexing your pages. This could include errors such as:
404 errors (not found).
Server errors.
Redirect issues.
With this report, you are able to view any pages that could not be indexed properly and repair the problems in order to boost your site’s SEO.
- Sitemaps
The Sitemaps section is where you can monitor the status of your sitemap submissions. Here, you can see:
How many pages were crawled by Google from your sitemap.
Whether there is a problem with your sitemap submission.
This makes sure that Google is crawling all of your essential pages on your site for search exposure.
- Mobile Usability Report
Since mobile-first indexing is now the default, you really need to check the Mobile Usability tab. It reveals any mobile usability problems on your website, such as:
Too small to read on mobile text.
Links too close together on mobile.
Fixing these issues allows you to deliver a better experience to mobile users, and this can enhance your rankings.
- Core Web Vitals
The Core Web Vitals section provides feedback on how your site is performing in user experience, like:
Largest Contentful Paint (LCP): Checks loading speed.
First Input Delay (FID): Checks interactivity.
Cumulative Layout Shift (CLS): Checks visual stability.
It’s important to optimize for Core Web Vitals because Google considers these ranking signals.
URL Inspection Tool
Google Search Console returns a URL Inspection Tool that is both helpful and useful, allowing you to check the indexing status of any page on your website. It tells you what Google considers a specific URL to be and whether it can be displayed in search results.
The tool can be especially helpful for finding issues, reporting new pages, and making sure your pages are crawled and indexed appropriately by Google.
What You Can Do with the URL Inspection Tool
- Check Index Status
Paste any URL from your website into the search box at the top of Google Search Console, and you’ll get a detailed report that shows:
Whether the page is indexed or not.
When Google last crawled the page.
Whether there are errors preventing indexing.
The canonical URL (the version Google considers the “main” one).
- View Crawling and Rendering Information
You can see how Googlebot crawled your page, including:
Whether the page was mobile-friendly.
Whether there were any JavaScript or resource-blocking problems with content.
Which resources (images, scripts, CSS) were downloaded on crawl.
- Request Indexing
If you just created a new page or changed an existing one, you can ask Google to re-crawl the page by using the “Request Indexing” option. This speeds up how quickly your updates appear in search results. - Diagnose and Fix SEO Issues
If a page is not showing up in search results, the URL Inspection Tool helps you figure out why. You can see:
Whether the page was blocked by virtue of a noindex tag.
Whether there are redirects.
Whether the page is robot-blocked.
Index Coverage Report
The Google Search Console Index Coverage Report tells you which pages on your site have been successfully indexed by Google — and which ones aren’t. It’s one of the most important tools for monitoring the health of your site in search and discovering indexing issues that can impact SEO performance.
This report allows you to view whether Google is able to crawl and index your pages properly, and if not, which specific errors or warnings you should fix.
Key Sections of the Index Coverage Report
The report is divided into four status types:
- Error
These are critical issues that prevent Google from indexing certain pages. Common errors are:
Server errors (5xx)
Redirect loops
Submitted URL blocked by robots.txt
Submitted URL marked ‘noindex’
Fixing errors needs to be given high priority because they affect the ranking of your site in the search results.
- Valid with Warnings
This group includes pages that are crawled but possibly some problems. They may contain:
Indexed, yet blocked by robots.txt
Indexed with some crawl anomalies
Warnings must be reviewed, though sometimes they may not require attention right away.
- Valid
These are pages successfully indexed by Google and eligible to appear in search results. This is the optimal status for your precious content. - Excluded
These are pages that Google decided not to index. Common reasons are:
Duplicate content
Page redirected
Alternate page with canonical tag
Crawled but not indexed (typically a sign of low-value or thin content)
Understanding why a page is excluded can help you optimize or consolidate content.
How to Use the Report Effectively
Filter by Page or Sitemap: Focus on specific parts of your site to find issues more easily.
Check Recent Errors: Regularly review newly reported issues.
Fix and Validate: After fixing a problem, use the Validate Fix button in Google Search Console to let Google know the issue is resolved.
Sitemaps Submission
Submitting a sitemap is a simple but useful step to help Google Search Console understand the structure of your website. A sitemap is an XML file that lists all of the important pages on your website, which enables Google to crawl and index your content more efficiently.
By adding your sitemap to Google Search Console, you make Google aware of your site’s important pages and enable it to find new or updated content more quickly.
Why Sitemaps are Important
Although Google can typically find pages through internal linking, a sitemap serves as a map for search engines. It’s particularly helpful if:
Your website has a large number of pages.
Your site is new and lacks backlinks.
Some pages are not easily discovered by crawlers (e.g., due to few internal links).
How to Submit a Sitemap in Google Search Console
Step 1: Create a Sitemap
Most sites automatically create a sitemap through tools or plugins. For example:
WordPress: Use plugins like Yoast SEO or Rank Math to generate your sitemap.
Shopify or Wix: Automatically generate sitemaps.
Your sitemap URL usually looks like:
https://yourdomain.com/sitemap.xml
Step 2: Log in to Google Search Console
Go to Google Search Console, then click on your website property.
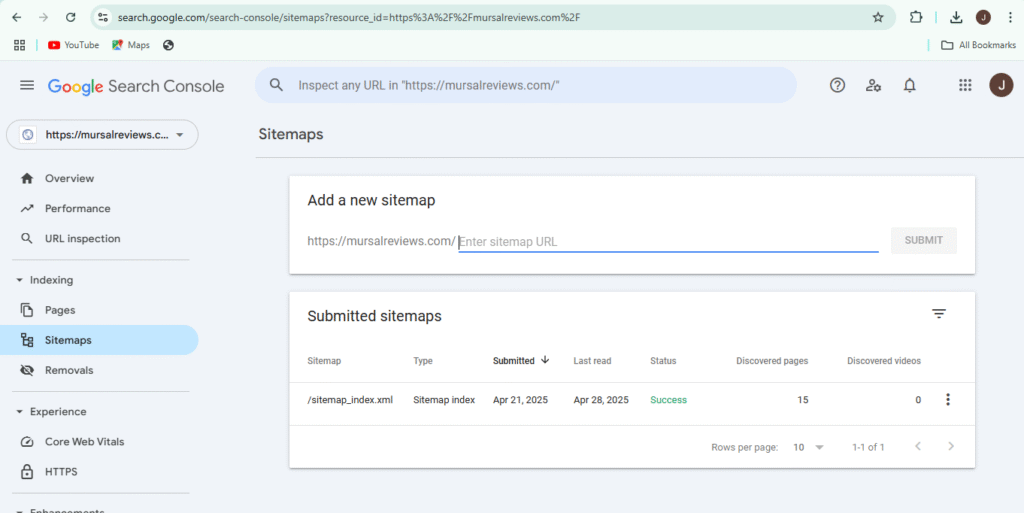
Step 3: Go to the “Sitemaps” Section
Click on “Sitemaps” in the left-hand menu.
Step 4: Submit Your Sitemap URL
Copy and paste your sitemap URL into the box that reads “Add a new sitemap,” then click Submit.
Step 5: Monitor Your Submission Status
After submission, you can check the status of your sitemap to determine whether it was processed successfully or not. Any errors will be listed here, and you can take action to rectify them.
Manual Actions & Security Issues
The Manual Actions and Security Issues reports in Google Search Console are crucial tools to help your site be safe, secure, and in good standing with Google. These reports will alert you to whether Google ever has taken any action against your site or whether your site ever has been infected by hackers or malware.
You must take any issues in these categories into consideration as soon as possible to help protect your rankings and your site’s reputation.
What Are Manual Actions?
A manual action is a penalty from Google’s human moderators when your site violates Google’s Webmaster Guidelines. A manual action can cause your site to be delisted from search results or a significant decrease in rankings if your site receives a manual action.
Causes of manual actions:
Spammy or unnatural links
Thin or low-quality pages
Cloaking or hidden text
Abuse of structured data
Sneaky redirects
If your site has a manual action, it will be reported in the “Manual Actions” report of Google Search Console, along with details and a recommended fix.
How to Fix a Manual Action:
Read the description in the report very carefully.
Fix the issue on your site.
Make a reconsideration request explaining what you have done to address the issue.
Google will review your request and notify you of the outcome.
What Are Security Issues?
The Security Issues report alerts you if Google determines that your site is compromised or is distributing malware, phishing pages, or unwanted software. These issues can harm users and result in browser warnings that scare people away.
Some examples of security issues include:
Malware infections
Phishing pages
SQL injections
Cross-site scripting (XSS) attacks
When a problem is detected, Google Search Console will:
Show impacted URLs
Describe the type of attack
Recommend cleanup procedures
After resolving the issue, you can submit a request from Google to remove warnings.
Conclusion
Google Search Console is quite possibly the best free tool available that you can utilize to improve your website’s SEO. If you’re analyzing your site’s performance, monitoring for indexing issues, submitting sitemaps, or fixing mobile usability issues, this tool gives you the data you need to optimize your site for search.
By employing resources like the Performance Report, Index Coverage and URL Inspection Tool on a daily basis, you can identify technical issues beforehand and do the right things to improve visibility and rankings. The Manual Actions and Security Issues sections also keep your site penalty-free and secure.
If your goal is seriously to expand your online presence, learning Google Search Console has got to be somewhere at the forefront of your to-do list. It’s not a tool — it’s your connection lifeline to Google, and a valuable part of every successful SEO strategy.